9 : LED Strip (also works for LED rings and matrices)
An important precision is that we are going to talk about “5V addressable RGB LEDs” commonly referred to as “NeoPixels” but more exactly “ws2812b”. This chapter will not cover the other types of LED strips such as the “5050” which are non-addressable white-only 12V LEDs or the “ws2811” which are 12V addressable RGB LEDs.
Addressable : you can control each LED individually as opposed to controlling the whole strip as one entity. Being addressable is what enables you to animate the strip and easily setup multiple colors on the same strip.
5V or 12V : You can expect your 12V strip to be able to consume more power, making them brighter. We’re working with 5V because it is easier to come across, the USB ports of your computer provide 5V, your phone charger does, the arduino uno as well. 5V just makes it easier to get started.
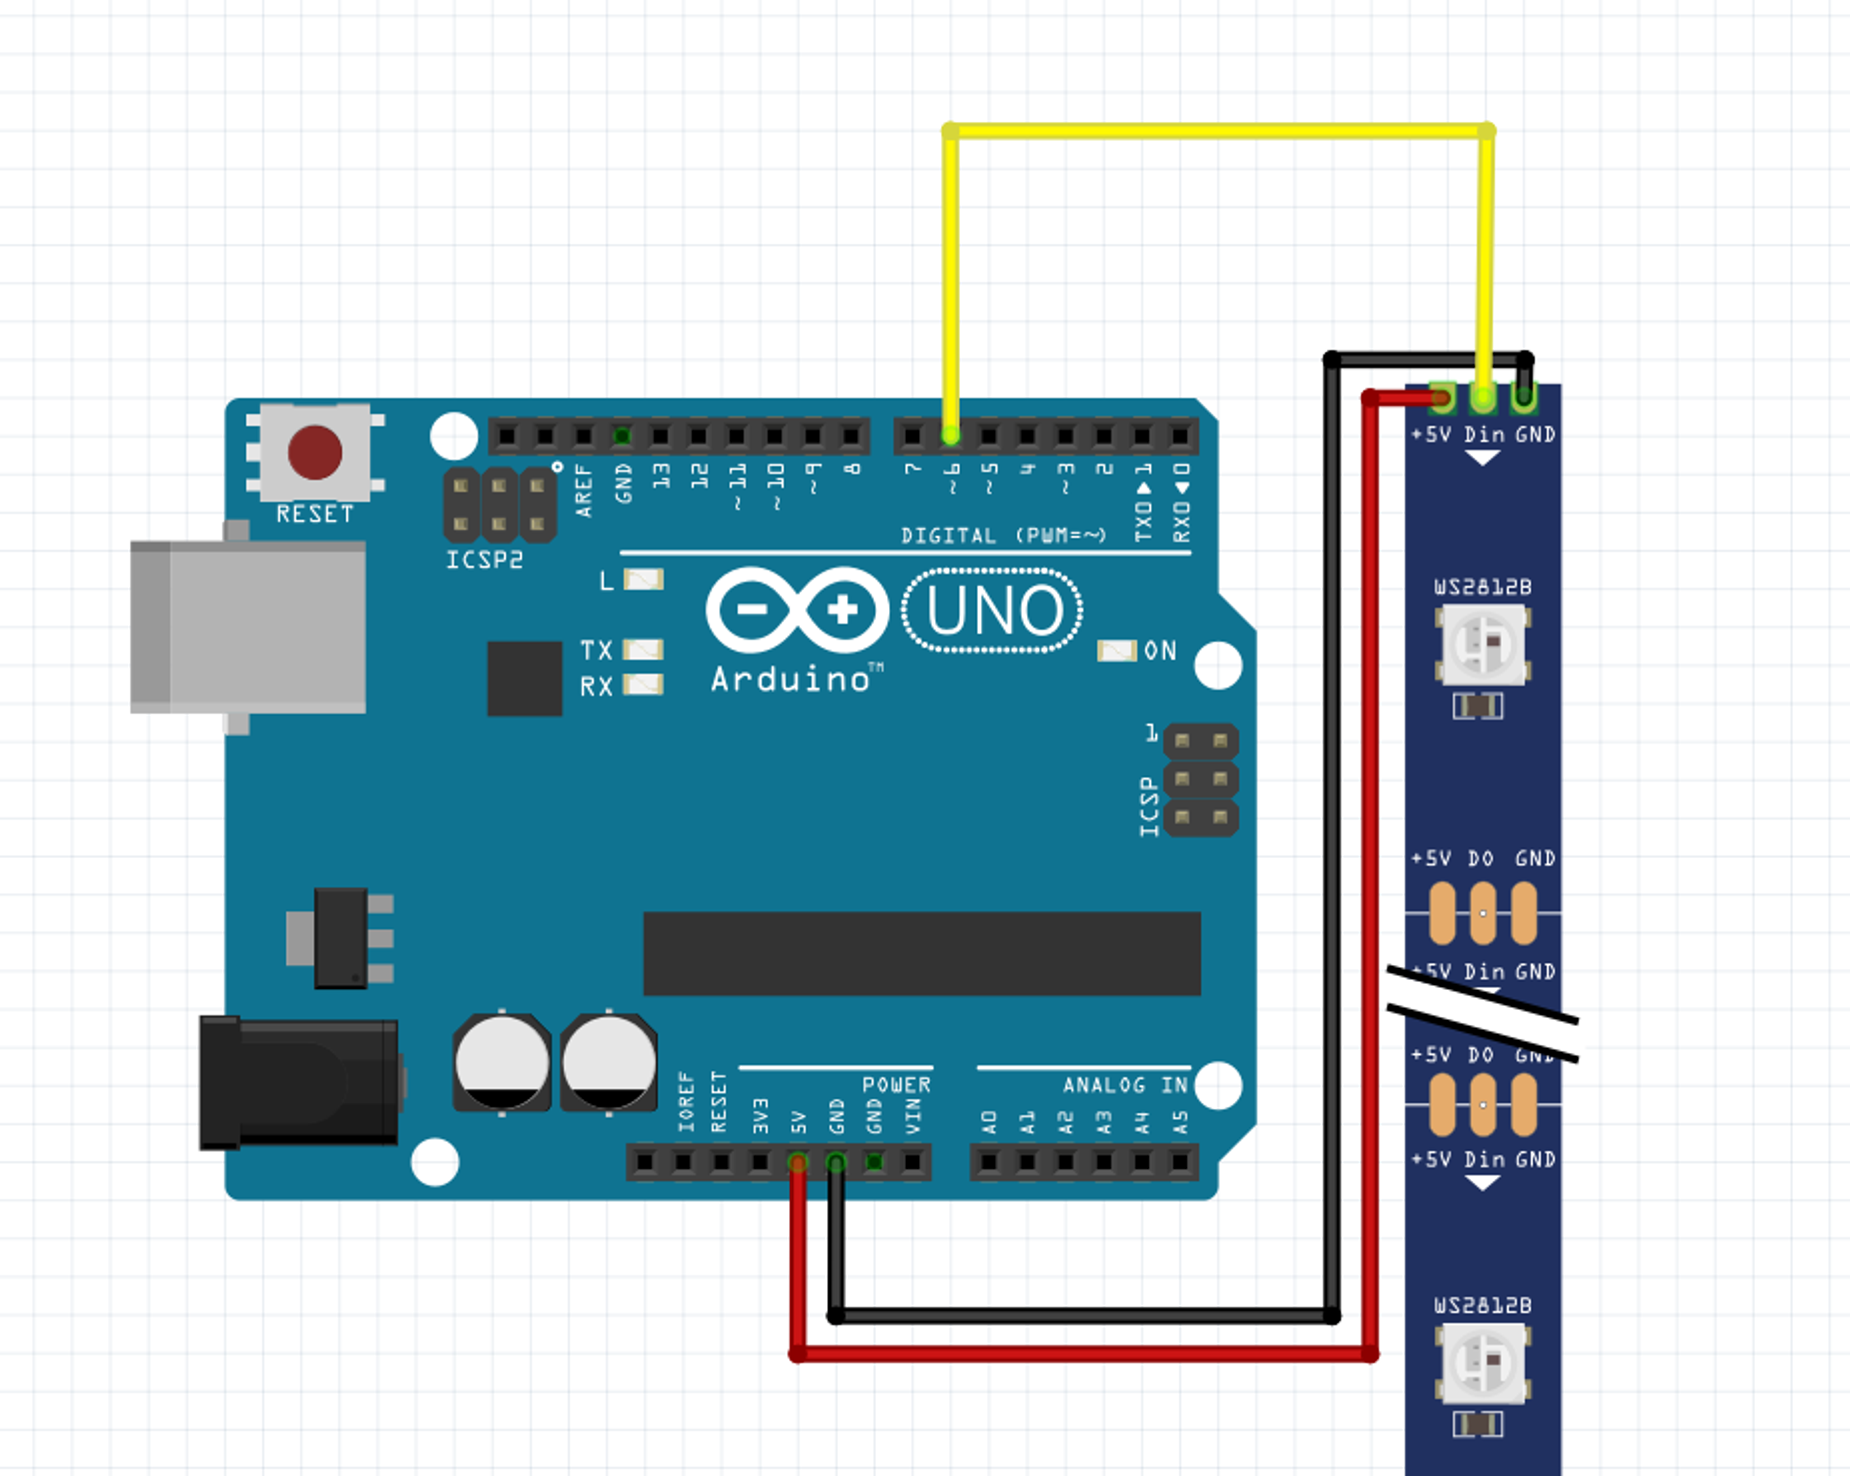
Make sure you connect the input of the strip (Din) to the pin 6 and not the output of the strip (Dout)

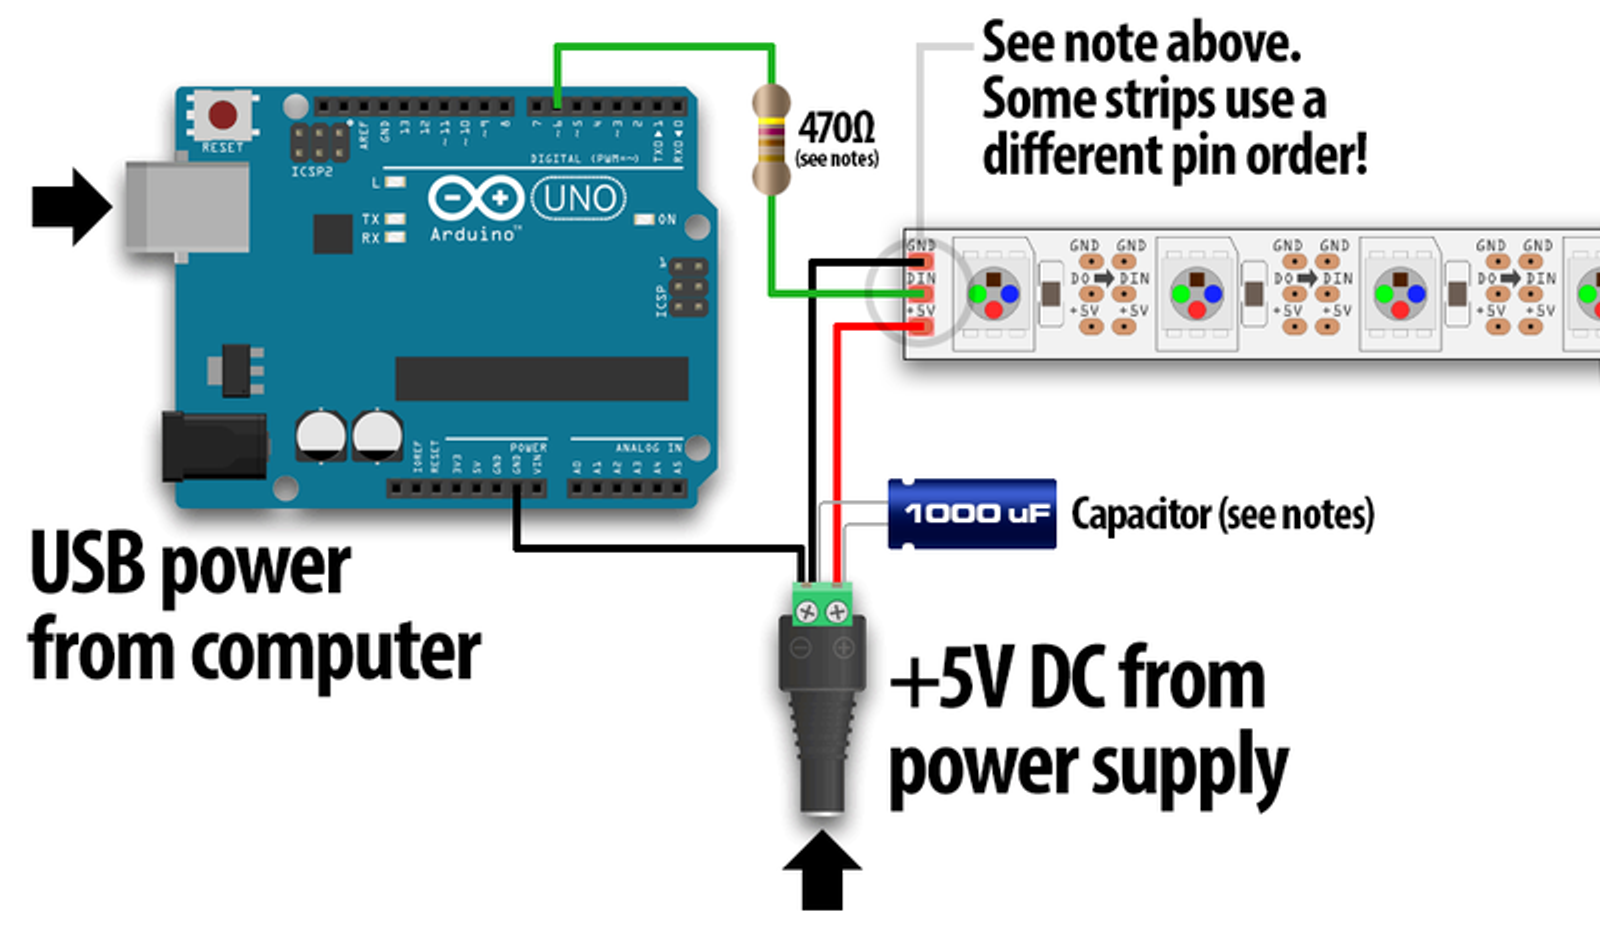
The real circuit if you do more than experimenting
more info here : https://learn.adafruit.com/adafruit-neopixel-uberguide/basic-connections

Just like the MPR121, because it’s more complex than an digital sensor (ON or OFF) or an analog sensor (somewhere between ON and OFF) we will need a library. In which case I’m in the habit of using Adafruit_NeoPixel but some people prefer to use FastLED. Which one we choose does not really matter until we start talking about 500+ LEDs.
If you really want to dig in the differences
here is a nice blog post : https://blog.ja-ke.tech/2019/06/02/neopixel-performance.html
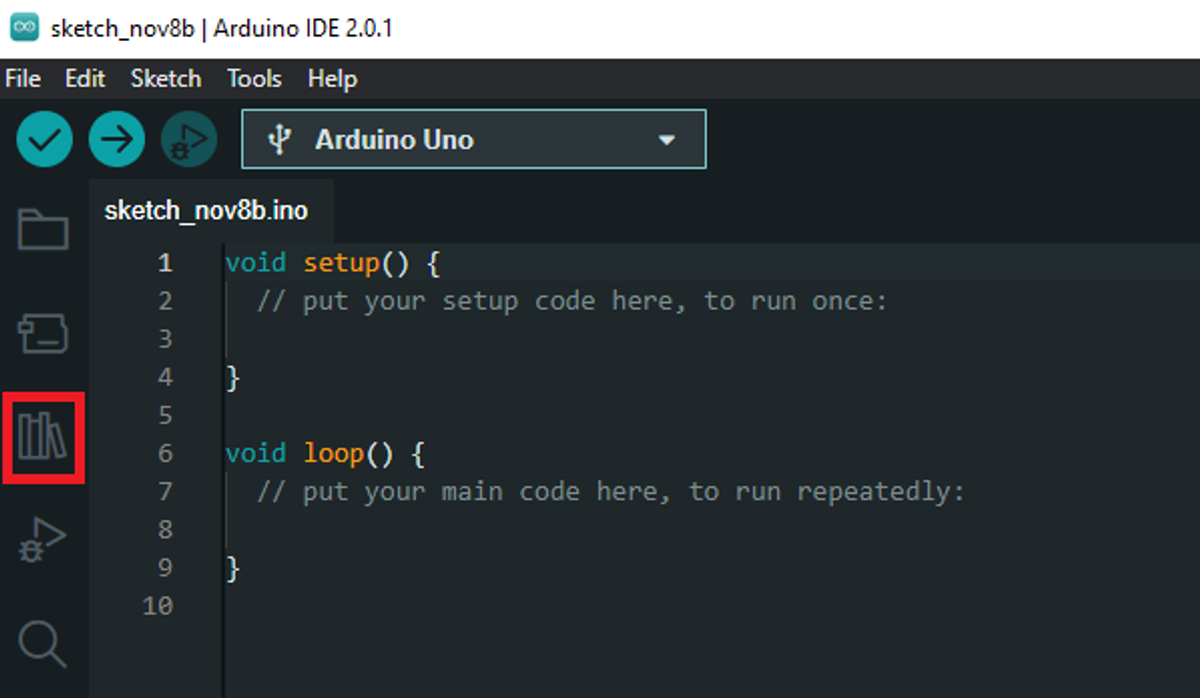
Just like before, go into Tools > Manage Libraries ... but look for Adafruit_Neopixel

Just like we did with the MPR121, go into File > Examples and take the simple example. Judging by its name it should be the easiest to read/re-use
Picking an example is always an excellent way to get started with any library but the “simple” example can be simplified if we assume you are using an arduino uno and if we get rid of the animation for now. Giving us this quite simple code.
#include <Adafruit_NeoPixel.h>
// Specify that the Din pin of the strip is connected to D6
#define PIN 6

// How many NeoPixels are attached to the Arduino?
#define NUMPIXELS 16

// This will create a variable "pixels" which is an object representing our strip/ring,
// you can think of an object as mutiple variables and functions stored in a single variable
// we do this because these variables and function because they go together.
// Note that for older NeoPixel strips you might need to change the third parameter -- see the
// strandtest example for more information on possible values.
Adafruit_NeoPixel pixels(NUMPIXELS, PIN, NEO_GRB + NEO_KHZ800);

void setup() {
  // connect the NeoPixel strip object
  pixels.begin();

  // sets the pixels at address 1 to red = 0, green = 150, blue = 0
  // the rgb values goes between 0 and 255
  pixels.setPixelColor(1, pixels.Color(0, 150, 0));

  // Send the updated pixel colors to the actual strip.
  // This will put in effect all the "pixels.setPixelColor()" since the last "pixels.show()"
  pixels.show();
}

void loop() {}
What happens if you try it?
The second LED lights up in green. That’s because we start counting our LED addresses from 0. So the address 1 is not the 1st LED but the 2nd.
If you have a strip of 8 LEDs you might be tempted to do it like that :
#include <Adafruit_NeoPixel.h>
#define PIN 6
#define NUMPIXELS 8

Adafruit_NeoPixel pixels(NUMPIXELS, PIN, NEO_GRB + NEO_KHZ800);

void setup() {
  pixels.begin();

  pixels.setPixelColor(0, pixels.Color(0, 150, 0));
  pixels.setPixelColor(1, pixels.Color(0, 150, 0));
  pixels.setPixelColor(2, pixels.Color(0, 150, 0));
  pixels.setPixelColor(3, pixels.Color(0, 150, 0));
  pixels.setPixelColor(4, pixels.Color(0, 150, 0));
  pixels.setPixelColor(5, pixels.Color(0, 150, 0));
  pixels.setPixelColor(6, pixels.Color(0, 150, 0));
  pixels.setPixelColor(7, pixels.Color(0, 150, 0));

  pixels.show();
}

void loop() {}
But there is 30 or 60 LEDs per meter in regular strips, so applying this solution quickly going to be
- tedious to write the first time
- super hard to modify without messing up
The loops
In programming the loops are meant to do one piece of code multiple times. There are different ways of looping. We’re going to see while first.
Remember if? It’s a block of code you get in if the condition is valid. while is a bit like that, it also takes a condition but you do the block over and over and over and … until the condition is becomes false.
int counter = 0;

void setup() {
  Serial.begin(115200);

  while(counter < 10){
      Serial.println(counter);
      counter += 1;
  }
}

void loop() {}
Result
0
1
2
3
4
5
6
7
8
9
The code is not in the loop because that lets you execute it at your own pace, and not have the monitor show a constant stream of numbers. Just press the reset button of the arduino if you want to re-execute the code.
So, while counter was less than 10, we kept printing it in the console and raising it by 1. That seems to be all we wanted, a block of code that executes Nth times, we just need to throw our pixels.setColor() in there and we’re good.
Yes, but there are slight problems which makes while loops rarely used.
- It relies on the
countervariable to exist and have the right value when we begin. - We have to update the
countervariable inside of the loop so that at some point we stop looping and go on with the rest of our program.
This is why we mostly rely on the big daddy of all loops, the for loop.
void setup() {
  Serial.begin(115200);

    for(int counter = 0; counter < 10; counter += 1){
      Serial.println(counter);
  }
}

void loop() {}
0
1
2
3
4
5
6
7
8
9
The for loop seems harder at a glance but it does exactly the same thing except it relies only on itself. The while loop only had two components, the condition for staying and its body (the block of code to repeat). But the for loop has 4 components:
- The initialization
int counter = 0;: this is executed only once, when the looping starts. We almost always use it to setup the variable which will condition if we’re staying in the loop or not. - The condition
counter < 10;: just likewhile, so long as this condition remainstruewe go back to the beginning of the body of theforwhen we reach the end. - The stepping instruction
counter += 1: This instruction is done before going through the body of thefor, it serves to update the variable conditioning if we stay in the loop or not. - Usually people use
counter++, which the same thing. - The body : Starting at
{and ending at}these are the instruction to repeat.
Exercise 13
Given this extra example ...
void setup() {
  Serial.begin(115200);

    for(int counter = 0; counter < 10; counter += 2){
      Serial.println(counter);
  }
}

void loop() {}
Result:
0
2
4
6
8
... what would be the result of the following code (please try to answer without executing the code on your arduino):
void setup() {
  Serial.begin(115200);

    for(int counter = 8; counter > 0; counter -= 1){
      Serial.println(counter);
  }
}

void loop() {}
answer
8
7
6
5
4
3
2
1
And now, we know how to give one color to the whole strip in 3 lines, regardless of the size of the strip.
#include <Adafruit_NeoPixel.h>
#define PIN 6
#define NUMPIXELS 8

Adafruit_NeoPixel pixels(NUMPIXELS, PIN, NEO_GRB + NEO_KHZ800);

void setup() {
  pixels.begin();

    for(int stepCount = 0; stepCount < NUMPIXELS; stepCount++){
          pixels.setPixelColor(stepCount, pixels.Color(0, 150, 0));
    }

  pixels.show();
}

void loop() {}
Each time we go through the for loop we add 1 to stepCount and we use it to select a pixel and set its color. But what if in addition to that we add stepCount to the base green value of 150 ?
for(int stepCount = 0; stepCount < NUMPIXELS; stepCount++){
          pixels.setPixelColor(stepCount, pixels.Color(0, 150 + stepCount, 0));
    }
Then the first pixel of our strip will have a green value of 150,
the second pixel will have a value of 150 + 1,
the third will pixel will have a value of 150 + 2,
[…] the last one will have a green value of 150 + NUMPIXELS
This will create a green gradient going from “some green” to “more green”.
If tested it you might have not seen much difference because if your strip is 20 pixels long then you’ll go from 150 to 170. It would be better to take bigger steps (for the green) between each pixels so the green value could be equal to baseGreen + stepCount * diffPerPixel.
for(int stepCount = 0; stepCount < NUMPIXELS; stepCount++){
          pixels.setPixelColor(stepCount, pixels.Color(0, 0 + stepCount * 12, 0));
    }
We just need to be careful that the last pixel’s green value remains under 255 which is why the base green has been lowered to 0 in the example (and also to make the gradient very obvious).
Animating
Animating your strip is just putting more things on top of what we are doing. Animation is just change over time, so what if we add to our last example a global variable called baseBlue starting at 0 and we add to it until it reaches 120 then we subtract to it until it goes back to 0 and then go back to adding until 120 , that would mean the the whole blue value will go up and down with the time which will make your LED strip oscillate between green and and blue, passing by cyan.
How did I decide on 120? I don’t know it’s the artistic process, I just tried stuff.
#include <Adafruit_NeoPixel.h>
#define PIN 6
#define NUMPIXELS 8

Adafruit_NeoPixel pixels(NUMPIXELS, PIN, NEO_GRB + NEO_KHZ800);
int baseBlue = 0;
int baseBlueGoingUp = true;

void setup() {
  pixels.begin();
}

void loop() {
  if(baseBlue >= 120){//if we're past the maximum
    baseBlueGoingUp = false;//switch to "going-down" mode
  }else if(baseBlue <= 0){//... but if we're below the minimum
    baseBlueGoingUp = true;//switch to "going-up" mode
  }

  //Go up or down based on the current mode
  if(baseBlueGoingUp){
    baseBlue += 1;
  }else{
    baseBlue -= 1;
  }


  //we moved this code in the loop because now we want to continually "repaint" the strip
  for(int stepCount = 0; stepCount < NUMPIXELS; stepCount++){
      pixels.setPixelColor(stepCount, pixels.Color(0, 0 + stepCount * 20, baseBlue));
  }

  pixels.show();

  //one way to slow down the "breathing" effect is by not going at full speed
  //this delay will make sure we slow down. Reducing it will make he effect go faster
  delay(35);
}
Another concept I like for simple effects is to “paint the background” first for the whole strip then “paint the effect on top”.
Let’s say I have a fully green strip with a red pixel going back and forth over the strip I could do it this way.
#include <Adafruit_NeoPixel.h>
#define PIN 6
#define NUMPIXELS 8

Adafruit_NeoPixel pixels(NUMPIXELS, PIN, NEO_GRB + NEO_KHZ800);
int effectPosition = 0;
int effectGoingUp = true;

void setup() {
  pixels.begin();
}

void loop() {
  if(effectPosition >= NUMPIXELS){//if we're past the maximum
    effectGoingUp = false;//switch to "going-down" mode
  }else if(effectPosition <= 0){//... but if we're below the minimum
    effectGoingUp = true;//switch to "going-up" mode
  }

  //Go up or down based on the current mode
  if(effectGoingUp ){
    effectPosition += 1;
  }else{
    effectPosition -= 1;
  }


  //we first "paint" the whole strip
  for(int stepCount = 0; stepCount < NUMPIXELS; stepCount++){
      pixels.setPixelColor(stepCount, pixels.Color(0, 150, 0));
  }

    //then we paint the effect over it, writting new values only to the pixels affected
    pixels.setPixelColor(effectPosition,pixels.Color(255, 0, 0));

  pixels.show();

    //one way to slow down the "breathing" effect is by not going at full speed
    //this delay will make sure we slow down. Reducing it will make he effect go faster
  delay(35);
}
Just so you know, there are a few additional function which are cool:
pixels.setBrightness(value): this change the brightness of the whole strip, it takes values between0and255pixels.clear(): this will turn off all the LEDs without having to write aforloop (you’ll still have to usepixels.show()to see it though)pixels.ColorHSV(hue, saturation, value): this can replacepixels.Color(red, green, blue)and allow you to specify a hue between0and65535, while saturation and value are between0and255. and here is the complete documentation : https://adafruit.github.io/Adafruit_NeoPixel/html/class_adafruit___neo_pixel.html
Bonus animation because I can :
#include <Adafruit_NeoPixel.h>
#define PIN 6
#define NUMPIXELS 10
#define HUE_MAX 65535

unsigned int hue = 0;
short pos = 0;

Adafruit_NeoPixel pixels(NUMPIXELS, PIN, NEO_GRB + NEO_KHZ800);
void setup() {
  pixels.begin();
}

void loop() {
  hue += 666;
  hue = hue % HUE_MAX;

  pos += 1;
  pos = pos % NUMPIXELS;

  pixels.setPixelColor(pos, pixels.gamma32(pixels.ColorHSV(hue, 255, 100)));
  pixels.show();
  delay(30);
}
Conclusion:
Now, go forth my little color gremlins, and make it sparkle