8 : MPR121
Let’s work through this chapter like an intermediate arduino user would. Let’s say we have an idea of prototype in which we want to know if a user swiped from left to right or right to left. We can either query a search engine with something like “touch sensor arduino” which will introduce you a very interesting word “capacitive”. Or you could ask around (hint : try reaching to the person who gave you this document).
You’ll most likely end up with a recommendation to try an MPR121 which looks like this
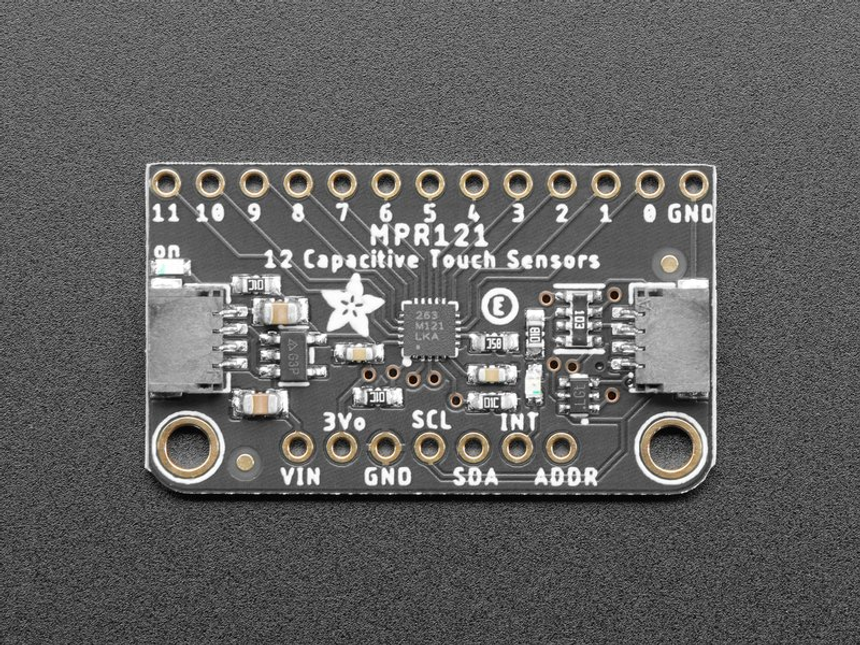
Ok, that’s progress, now you can query a search engine with “mpr121 arduino”. Which will give you tutorials. Below is the first link I got :
https://learn.adafruit.com/adafruit-mpr121-12-key-capacitive-touch-sensor-breakout-tutorial/wiring
In this case its a tutorial made by a reputable manufacturer so you can trust it blindly. But when this doesn’t happen, I like to add “buy” to my search query to end on the product page which most of the time will feature a section called “specifications”, “specs” or “documentation” (except on amazon and aliexpress/alibaba which are super iffy). Here is a page I got with this query :
https://boutique.semageek.com/en/481-capacitive-touch-shield-for-arduino-mpr121-3002400602270.html
Which takes us right back to the adafruit tutorial, now we’re sure it’s great stuff.
Proceeding with this tutorial, we end up with this circuit like this
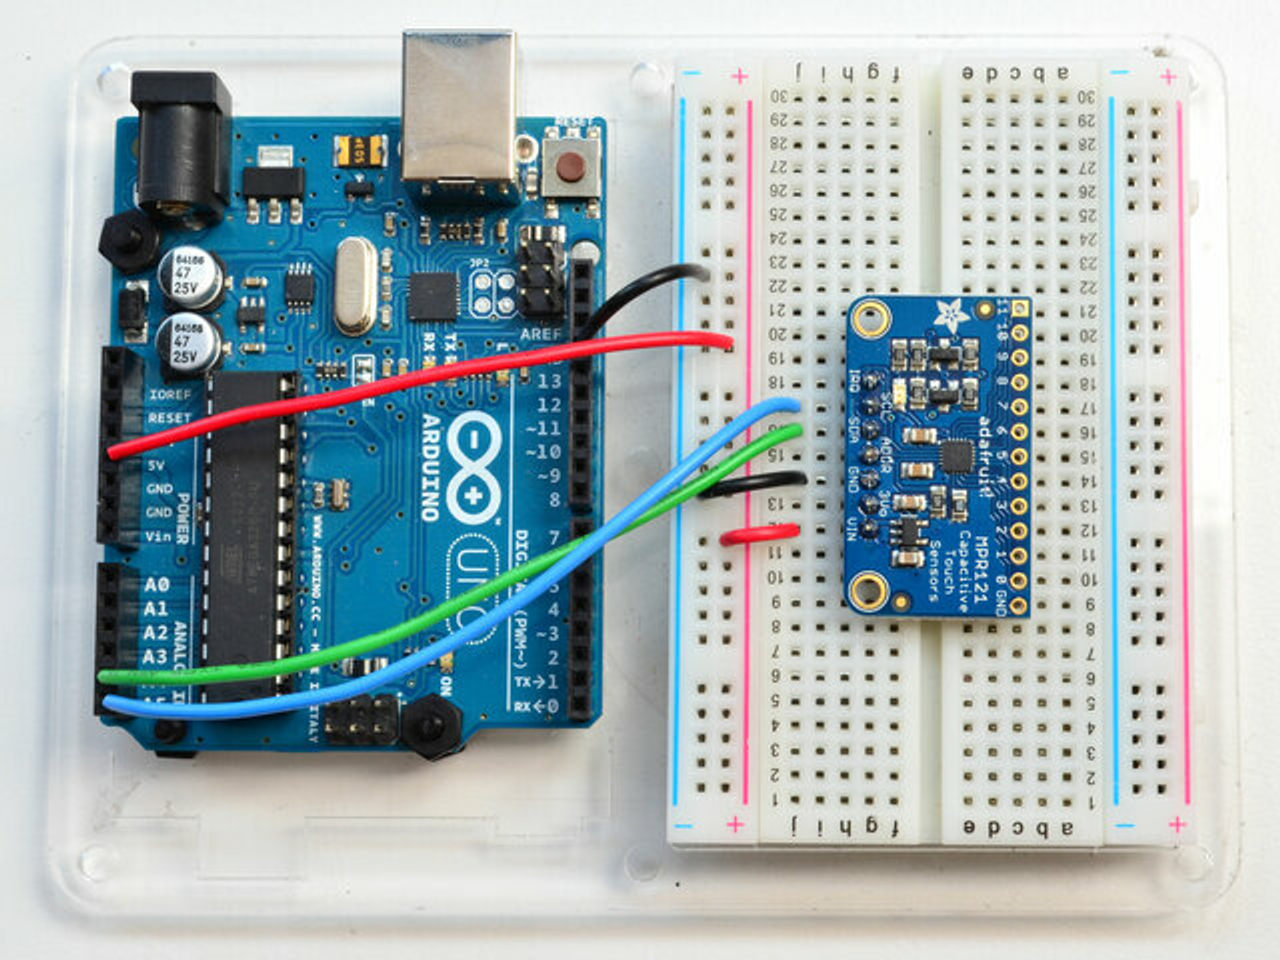
and this code
#include <Wire.h>
#include "Adafruit_MPR121.h"

#ifndef _BV
#define _BV(bit) (1 << (bit))
#endif

// You can have up to 4 on one i2c bus but one is enough for testing!
Adafruit_MPR121 cap = Adafruit_MPR121();

// Keeps track of the last pins touched
// so we know when buttons are 'released'
uint16_t lasttouched = 0;
uint16_t currtouched = 0;

void setup() {
  Serial.begin(9600);

  while (!Serial) { // needed to keep leonardo/micro from starting too fast!
    delay(10);
  }

  Serial.println("Adafruit MPR121 Capacitive Touch sensor test");

  // Default address is 0x5A, if tied to 3.3V its 0x5B
  // If tied to SDA its 0x5C and if SCL then 0x5D
  if (!cap.begin(0x5A)) {
    Serial.println("MPR121 not found, check wiring?");
    while (1);
  }
  Serial.println("MPR121 found!");
}

void loop() {
  // Get the currently touched pads
  currtouched = cap.touched();

  for (uint8_t i=0; i<12; i++) {
    // it if *is* touched and *wasnt* touched before, alert!
    if ((currtouched & _BV(i)) && !(lasttouched & _BV(i)) ) {
      Serial.print(i); Serial.println(" touched");
    }
    // if it *was* touched and now *isnt*, alert!
    if (!(currtouched & _BV(i)) && (lasttouched & _BV(i)) ) {
      Serial.print(i); Serial.println(" released");
    }
  }

  // reset our state
  lasttouched = currtouched;

  // comment out this line for detailed data from the sensor!
  return;

  // debugging info, what
  Serial.print("\t\t\t\t\t\t\t\t\t\t\t\t\t 0x"); Serial.println(cap.touched(), HEX);
  Serial.print("Filt: ");
  for (uint8_t i=0; i<12; i++) {
    Serial.print(cap.filteredData(i)); Serial.print("\t");
  }
  Serial.println();
  Serial.print("Base: ");
  for (uint8_t i=0; i<12; i++) {
    Serial.print(cap.baselineData(i)); Serial.print("\t");
  }
  Serial.println();

  // put a delay so it isn't overwhelming
  delay(100);
}
To arrive at this stage the tutorial showed you 2 important things :
- how to install a library (because <Servo.h> comes with the arduino IDE you’ve installed at the beginning of the course, but it’s definitely an exception rather than the rule)
- how to open an example from a library. Examples is code that works by default. What we’re going to see now is how to bend it into what we want. Remember we want to know if the user swipes from left to right or right to left.
First, don’t touch the code and upload it on your arduino. Open the serial monitor and try interacting with the module. In this case try touching one (or more) of the holes which goes from 0 to 11.
What do you see? If the answer is “nothing” or “undecipherable garbage”, you can try a few things
- search for the
Serial.begin()to see if the number provided is the same as in your monitor. If they don’t match, make them match by changing one of the two. - search for
Serial.println()orSerial.print(), if you see nothing in the monitor it might be because the code doesn’t come with any. In which case start by usingSerial.println()with a variable that looks key to you (or just any), you can also add a delay at the end of theloop(){}bloc to make it more readable in speed.
In theory you’ll have an output looking like the screenshot below
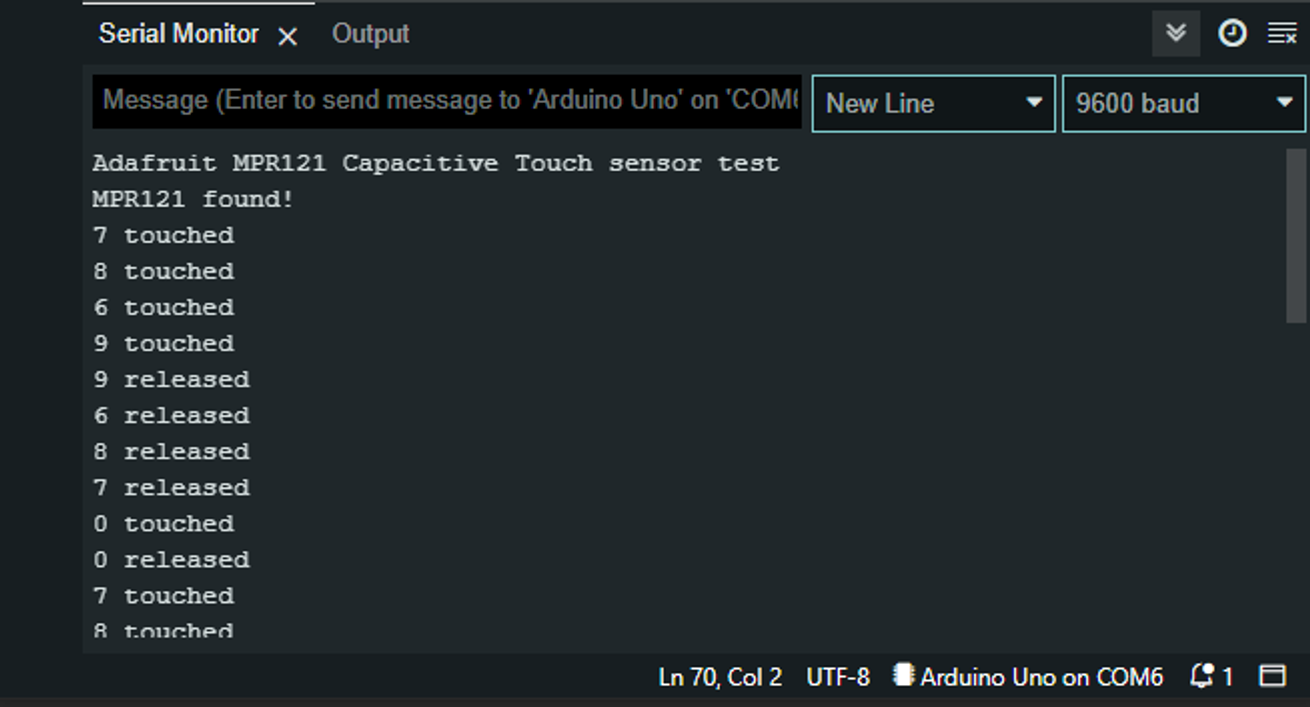
You know each line in the monitor is the product of a Serial.println(). Therefore, all the lines we’re seeing are coming from the lines 41 and 45.
Why don't we see the prints from line 56 through 66?
the return keyword on line 70 exits the current function right away, in this case it is the loop(){} function, so whatever is after line 70 it dosen’t get the chance to be read.
If we think about it, we could define a swipe as touching one pin then another so let’s say we want to check for 0 → 1 swipes and 1 → 0.
The Serial.print() on line 41 only happen when we touched a pin, i holds the value of which pin we touched. We could store the value of i and next time we touch a pin we can look up the value we stored. If we touch the pin 1 and we stored 0 then it’s a swipe!
Hang on, there is already a variable called lasttouched doesn’t it already hold the last pin touched? How can you know? By printing into the monitor!
Here is what we get if we inject Serial.println(lasttouched) right at the start of the loop(){} bloc (line 35)
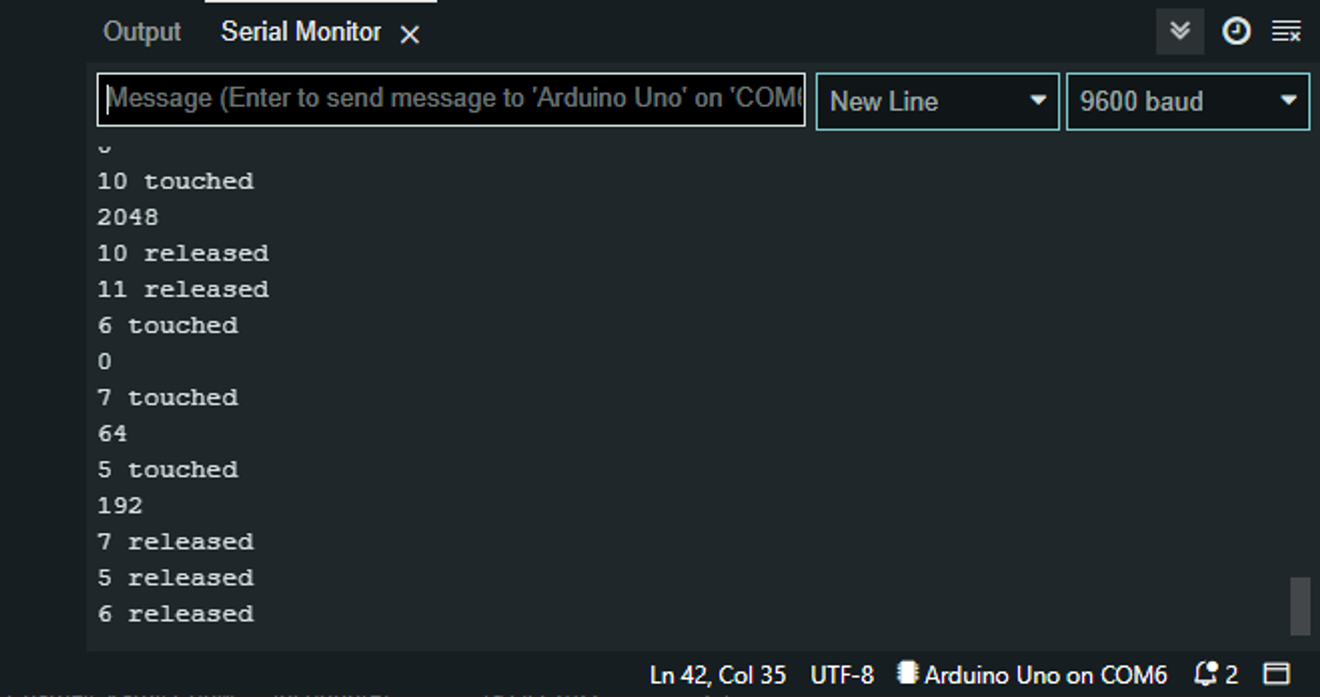
64? 2048? 192? That does not look like what we want. Now that we know, remove the printing we just added and add a variable at line 15. Pins go from 0 to 11 and are always whole numbers so a int type variable will be fan let’s call it lastTouch. Going back to our valuable print on line 41 (now it might be 42). You can inject the following code below the Serial.print(i); Serial.println(" touched");
//the && means "and" so we'll go into the if bloc only if both conditions are met
if(i == 0 && lastTouch == 1){
    Serial.println("got a swipe 1 -> 0");
}

if(i == 1 && lastTouch == 0){
    Serial.println("got a swipe 0 -> 1");
}

//you need to refresh lastTouch after the comparison with i,
//otherwise they will always be equal
lastTouch = i;
And here we are, we could connect the 0 and 1 pins of our MPR121 to a piece of aluminum foil for each and be able to know if we swiped from one to the other.
Well, this ain’t perfect because in reality this solution will allow you to take an infinite amount of time between the beginning and the end of the swipe.
Optionnal exercise 1
Only allow 200ms between the start and end of the swipe
hint 1
You will need to use millis()
hint 2
You can’t complete a swipe if you erase (or put a junk value like -1 into) the variable lastTouch
Exercise 12
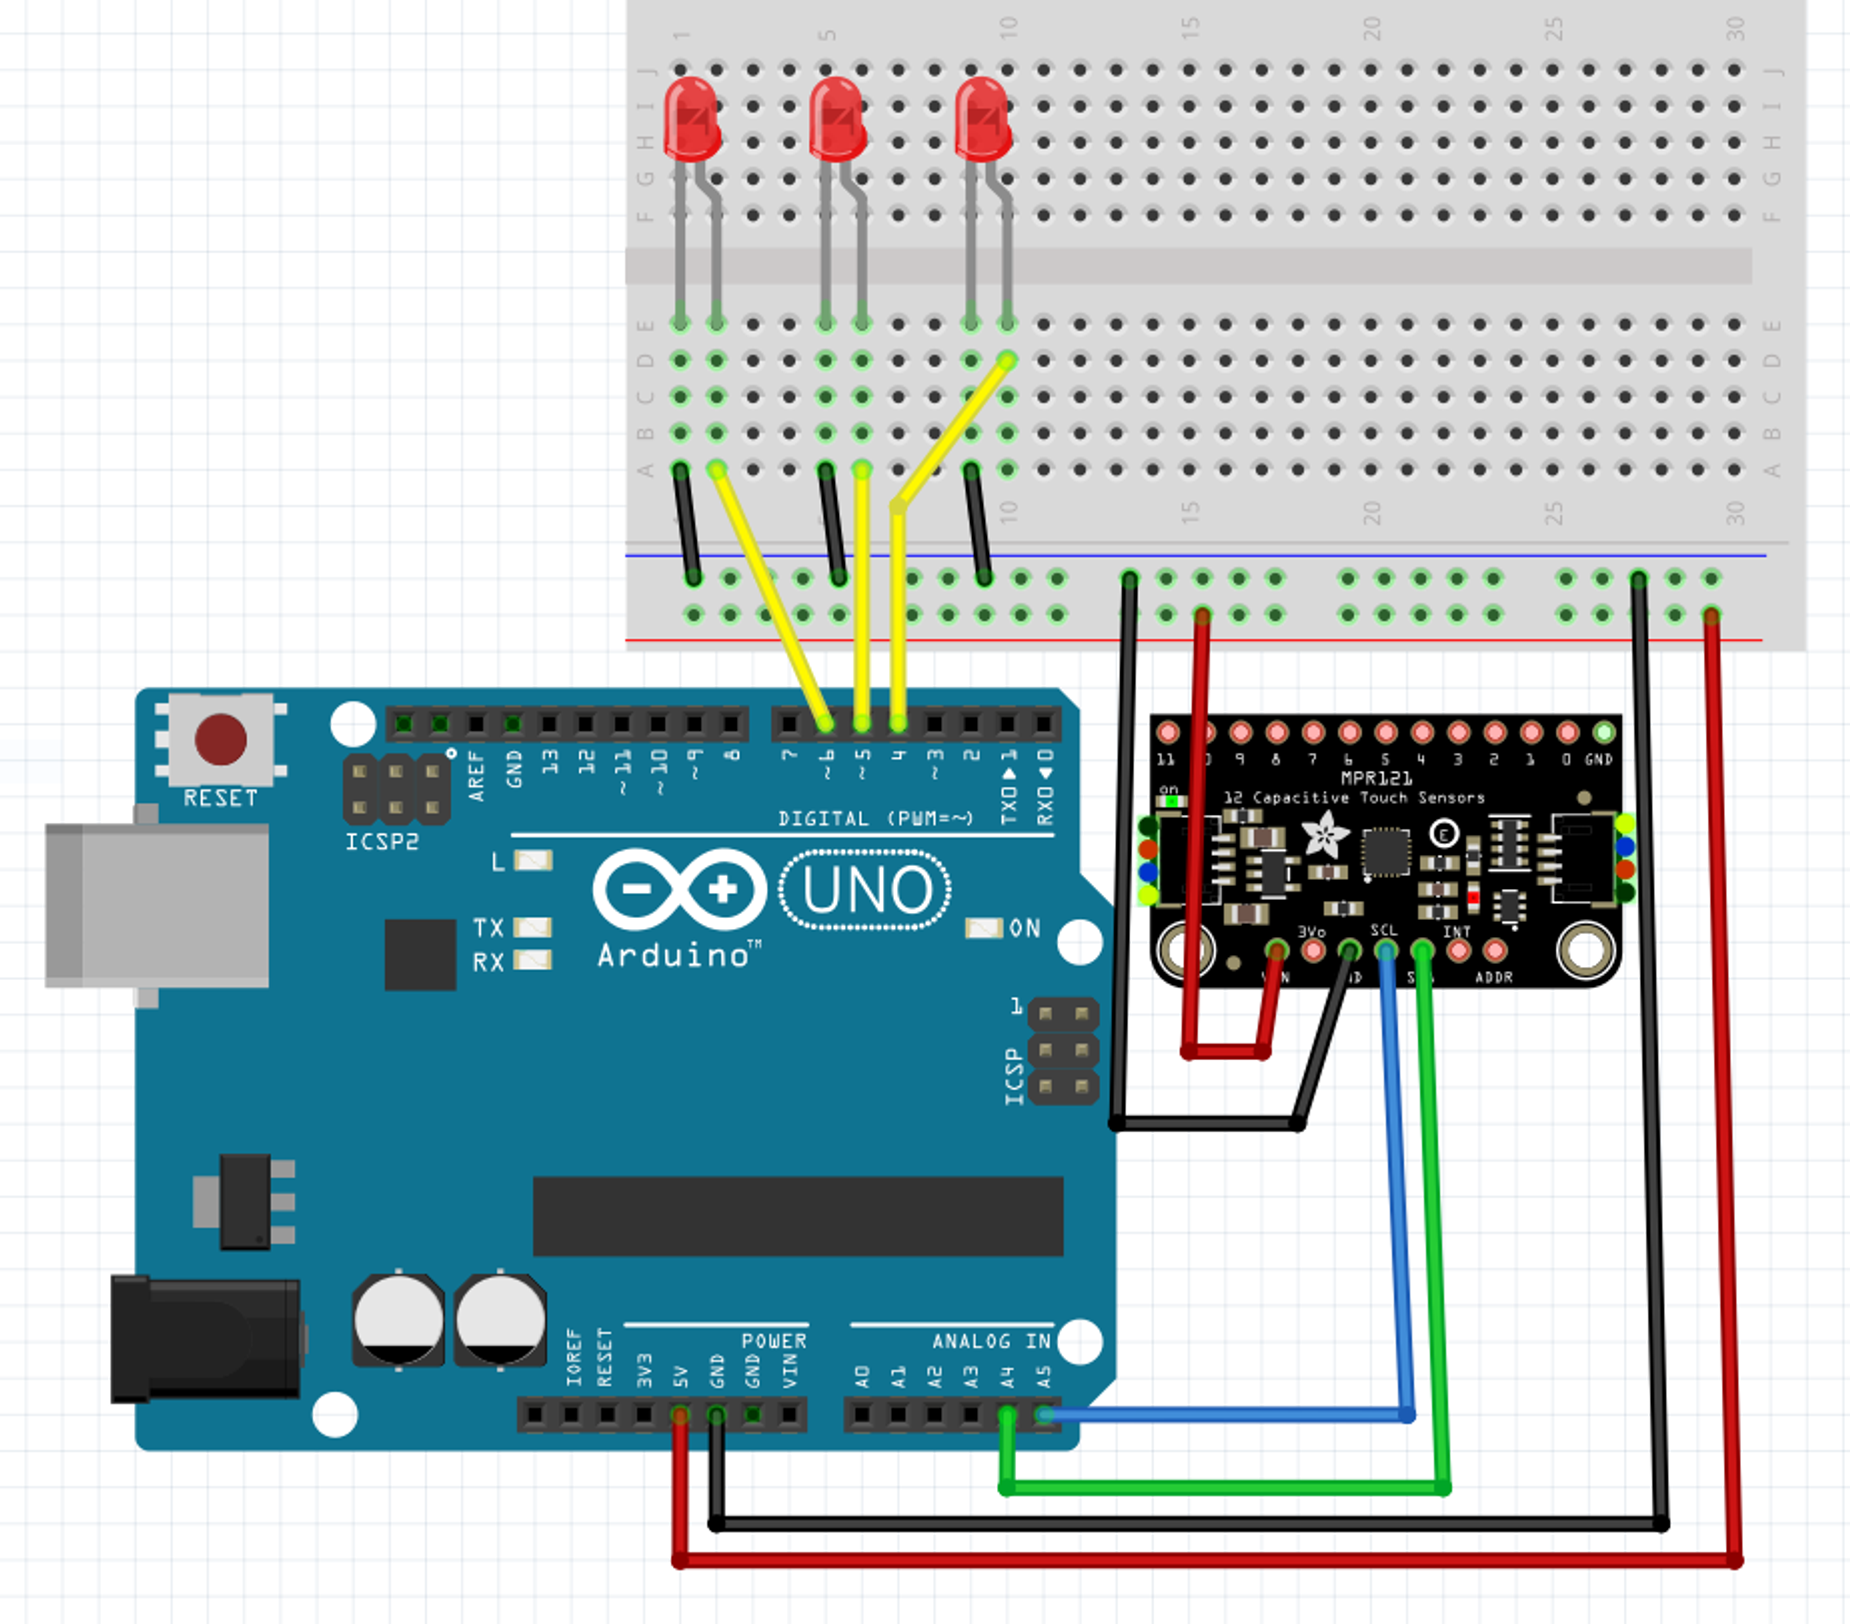
Wire a MPR121 and 4 LEDs to your arduino.
- As long as you are touching the pin 0, the first LED is turned on
- As long as you are touching the pin 1, the second LED is turned on
- As long as you are touching the pin 2, the third LED is turned on
- As long as you are touching the pin 3, the fourth LED is turned on
Circuit answer
Code answer
#include <Wire.h>
#include "Adafruit_MPR121.h"

#ifndef _BV
#define _BV(bit) (1 << (bit))
#endif

// You can have up to 4 on one i2c bus but one is enough for testing!
Adafruit_MPR121 cap = Adafruit_MPR121();

// Keeps track of the last pins touched
// so we know when buttons are 'released'
uint16_t lasttouched = 0;
uint16_t currtouched = 0;

void setup() {
  Serial.begin(9600);

  while (!Serial) { // needed to keep leonardo/micro from starting too fast!
    delay(10);
  }

  Serial.println("Adafruit MPR121 Capacitive Touch sensor test");

  // Default address is 0x5A, if tied to 3.3V its 0x5B
  // If tied to SDA its 0x5C and if SCL then 0x5D
  if (!cap.begin(0x5A)) {
    Serial.println("MPR121 not found, check wiring?");
    while (1);
  }
  Serial.println("MPR121 found!");

  //*** START OF WHAT THE ANSWER BRINGS (bloc 1 of 3) ***
  pinMode(4,OUTPUT);
  pinMode(5,OUTPUT);
  pinMode(6,OUTPUT);
  //*** END OF WHAT THE ANSWER BRINGS (bloc 1 of 3) ***
}

void loop() {
  // Get the currently touched pads
  currtouched = cap.touched();

  for (uint8_t i=0; i<12; i++) {
    // it if *is* touched and *wasnt* touched before, alert!
    if ((currtouched & _BV(i)) && !(lasttouched & _BV(i)) ) {
      Serial.print(i); Serial.println(" touched");

      //*** START OF WHAT THE ANSWER BRINGS (bloc 2 of 3) ***

      //apparently this if bloc executes when we put our finger on a pin
      //and the value of i is the number of that pin

      if(i == 0){
        digitalWrite(4,HIGH);
      }

      if(i == 1){
        digitalWrite(5,HIGH);
      }

      if(i == 2){
        digitalWrite(6,HIGH);
      }

      //*** END OF WHAT THE ANSWER BRINGS (bloc 2 of 3) ***
    }

    // if it *was* touched and now *isnt*, alert!
    if (!(currtouched & _BV(i)) && (lasttouched & _BV(i)) ) {
      Serial.print(i); Serial.println(" released");

      //*** START OF WHAT THE ANSWER BRINGS (bloc 3 of 3) ***

      //apparently this if bloc executes when we release our finger from a pin
      //and the value of i is the number of that pin
      if(i == 0){
        digitalWrite(4,LOW);
      }

      if(i == 1){
        digitalWrite(5,LOW);
      }

      if(i == 2){
        digitalWrite(6,LOW);
      }

      //*** END OF WHAT THE ANSWER BRINGS (bloc 3 of 3) ***
    }
  }

  // reset our state
  lasttouched = currtouched;

  // comment out this line for detailed data from the sensor!
  return;

  // debugging info, what
  Serial.print("\t\t\t\t\t\t\t\t\t\t\t\t\t 0x"); Serial.println(cap.touched(), HEX);
  Serial.print("Filt: ");
  for (uint8_t i=0; i<12; i++) {
    Serial.print(cap.filteredData(i)); Serial.print("\t");
  }
  Serial.println();
  Serial.print("Base: ");
  for (uint8_t i=0; i<12; i++) {
    Serial.print(cap.baselineData(i)); Serial.print("\t");
  }
  Serial.println();

  // put a delay so it isn't overwhelming
  delay(100);
}
Exercise 12.1
Wire a MPR121 and 4 LEDs to your arduino.
- When you release the pin 0, toggle the first LED (turn it on if it was off, or off if it was on)
- When you release the pin 1, toggle the second LED
- When you release the pin 2, toggle the third LED
- When you release the pin 3, toggle the fourth LED
Circuit answer
Exactly the same as the previous exercise
Code answer
#include <Wire.h>
#include "Adafruit_MPR121.h"

#ifndef _BV
#define _BV(bit) (1 << (bit))
#endif

// You can have up to 4 on one i2c bus but one is enough for testing!
Adafruit_MPR121 cap = Adafruit_MPR121();

// Keeps track of the last pins touched
// so we know when buttons are 'released'
uint16_t lasttouched = 0;
uint16_t currtouched = 0;

//*** START OF WHAT THE ANSWER BRINGS (bloc 1 of 3) ***
//these variables will help us keep track of whether or not the LEDS are turned on
bool led1State = false;
bool led2State = false;
bool led3State = false;
//*** END OF WHAT THE ANSWER BRINGS (bloc 1 of 3) ***

void setup() {
  Serial.begin(9600);

  while (!Serial) { // needed to keep leonardo/micro from starting too fast!
    delay(10);
  }

  Serial.println("Adafruit MPR121 Capacitive Touch sensor test");

  // Default address is 0x5A, if tied to 3.3V its 0x5B
  // If tied to SDA its 0x5C and if SCL then 0x5D
  if (!cap.begin(0x5A)) {
    Serial.println("MPR121 not found, check wiring?");
    while (1);
  }
  Serial.println("MPR121 found!");

  //*** START OF WHAT THE ANSWER BRINGS (bloc 2 of 3) ***
  //setup all the digital pin we are now using
  pinMode(4, OUTPUT);
  pinMode(5, OUTPUT);
  pinMode(6, OUTPUT);
  //*** END OF WHAT THE ANSWER BRINGS (bloc 2 of 3) ***
}

void loop() {
  // Get the currently touched pads
  currtouched = cap.touched();

  for (uint8_t i=0; i<12; i++) {
    // it if *is* touched and *wasnt* touched before, alert!
    if ((currtouched & _BV(i)) && !(lasttouched & _BV(i)) ) {
      Serial.print(i); Serial.println(" touched");
    }
    // if it *was* touched and now *isnt*, alert!
    if (!(currtouched & _BV(i)) && (lasttouched & _BV(i)) ) {
      Serial.print(i); Serial.println(" released");

      //*** START OF WHAT THE ANSWER BRINGS (bloc 3 of 3) ***
      //apparently this if bloc executes when we release our finger from a pin
      //and the value of i is the number of that pin

      if(i == 0){//if we release our finger from pin 0
        if(led1State == true){//then, if the first led is turned on
          digitalWrite(4, LOW);//turn it off
          led1State = false;//update the variable which keeps track of its state
        }else{//if it wasn't turned on
          digitalWrite(4, HIGH);//turn it on
          led1State = true;//update the variable which keeps track of its state
        }
      }

      //same thing with pin 1 and led2
      if(i == 1){
        if(led2State == true){
          digitalWrite(4, LOW);
          led2State = false;
        }else{
          digitalWrite(4, HIGH);
          led2State = true;
        }
      }

      //same thing with pin 2 and led3
      if(i == 2){
        if(led3State == true){
          digitalWrite(6, LOW);
          led3State = false;
        }else{
          digitalWrite(6, HIGH);
          led3State = true;
        }
      }

      //*** END OF WHAT THE ANSWER BRINGS (bloc 3 of 3) ***
    }
  }

  // reset our state
  lasttouched = currtouched;

  // comment out this line for detailed data from the sensor!
  return;

  // debugging info, what
  Serial.print("\t\t\t\t\t\t\t\t\t\t\t\t\t 0x"); Serial.println(cap.touched(), HEX);
  Serial.print("Filt: ");
  for (uint8_t i=0; i<12; i++) {
    Serial.print(cap.filteredData(i)); Serial.print("\t");
  }
  Serial.println();
  Serial.print("Base: ");
  for (uint8_t i=0; i<12; i++) {
    Serial.print(cap.baselineData(i)); Serial.print("\t");
  }
  Serial.println();

  // put a delay so it isn't overwhelming
  delay(100);
}
Optionnal exercise 2
Remove all the code which is not useful to us from the solution of exercise 12.1
Explore the code with Serial.print() or Serial.println() to test your assumption about what gets executed or not and whether or not it is essential to the solution.
answer
ain't that cleaner?
#include <Wire.h>
#include "Adafruit_MPR121.h"

#ifndef _BV
#define _BV(bit) (1 << (bit))
#endif

// You can have up to 4 on one i2c bus but one is enough for testing!
Adafruit_MPR121 cap = Adafruit_MPR121();

// Keeps track of the last pins touched
// so we know when buttons are 'released'
uint16_t lasttouched = 0;
uint16_t currtouched = 0;

//these variables will help us keep track of whether or not the LEDS are turned on
bool led1State = false;
bool led2State = false;
bool led3State = false;

void setup() {
  Serial.begin(9600);

  // Default address is 0x5A, if tied to 3.3V its 0x5B
  // If tied to SDA its 0x5C and if SCL then 0x5D
  if (!cap.begin(0x5A)) {
    Serial.println("MPR121 not found, check wiring?");
    while (1);
  }
  Serial.println("MPR121 found!");

  //setup all the digital pin we are now using
  pinMode(4, OUTPUT);
  pinMode(5, OUTPUT);
  pinMode(6, OUTPUT);
}

void loop() {
  // Get the currently touched pads
  currtouched = cap.touched();

  for (uint8_t i=0; i<12; i++) {
    // if it *was* touched and now *isnt*, alert!
    if (!(currtouched & _BV(i)) && (lasttouched & _BV(i)) ) {
      Serial.print(i); Serial.println(" released");

      //apparently this if bloc executes when we release our finger from a pin
      //and the value of i is the number of that pin

      if(i == 0){//if we release our finger from pin 0
        if(led1State == true){//then, if the first led is turned on
          digitalWrite(4, LOW);//turn it off
          led1State = false;//update the variable which keeps track of its state
        }else{//if it wasn't turned on
          digitalWrite(4, HIGH);//turn it on
          led1State = true;//update the variable which keeps track of its state
        }
      }

      //same thing with pin 1 and led2
      if(i == 1){
        if(led2State == true){
          digitalWrite(4, LOW);
          led2State = false;
        }else{
          digitalWrite(4, HIGH);
          led2State = true;
        }
      }

      //same thing with pin 2 and led3
      if(i == 2){
        if(led3State == true){
          digitalWrite(6, LOW);
          led3State = false;
        }else{
          digitalWrite(6, HIGH);
          led3State = true;
        }
      }
    }
  }

  // reset our state
  lasttouched = currtouched;
}
It’s always nice to end up a work session with cleaning your code. If you make it a habit you will make your code more reusable for your future self and any person who wants to help.