7 : Servo Motor

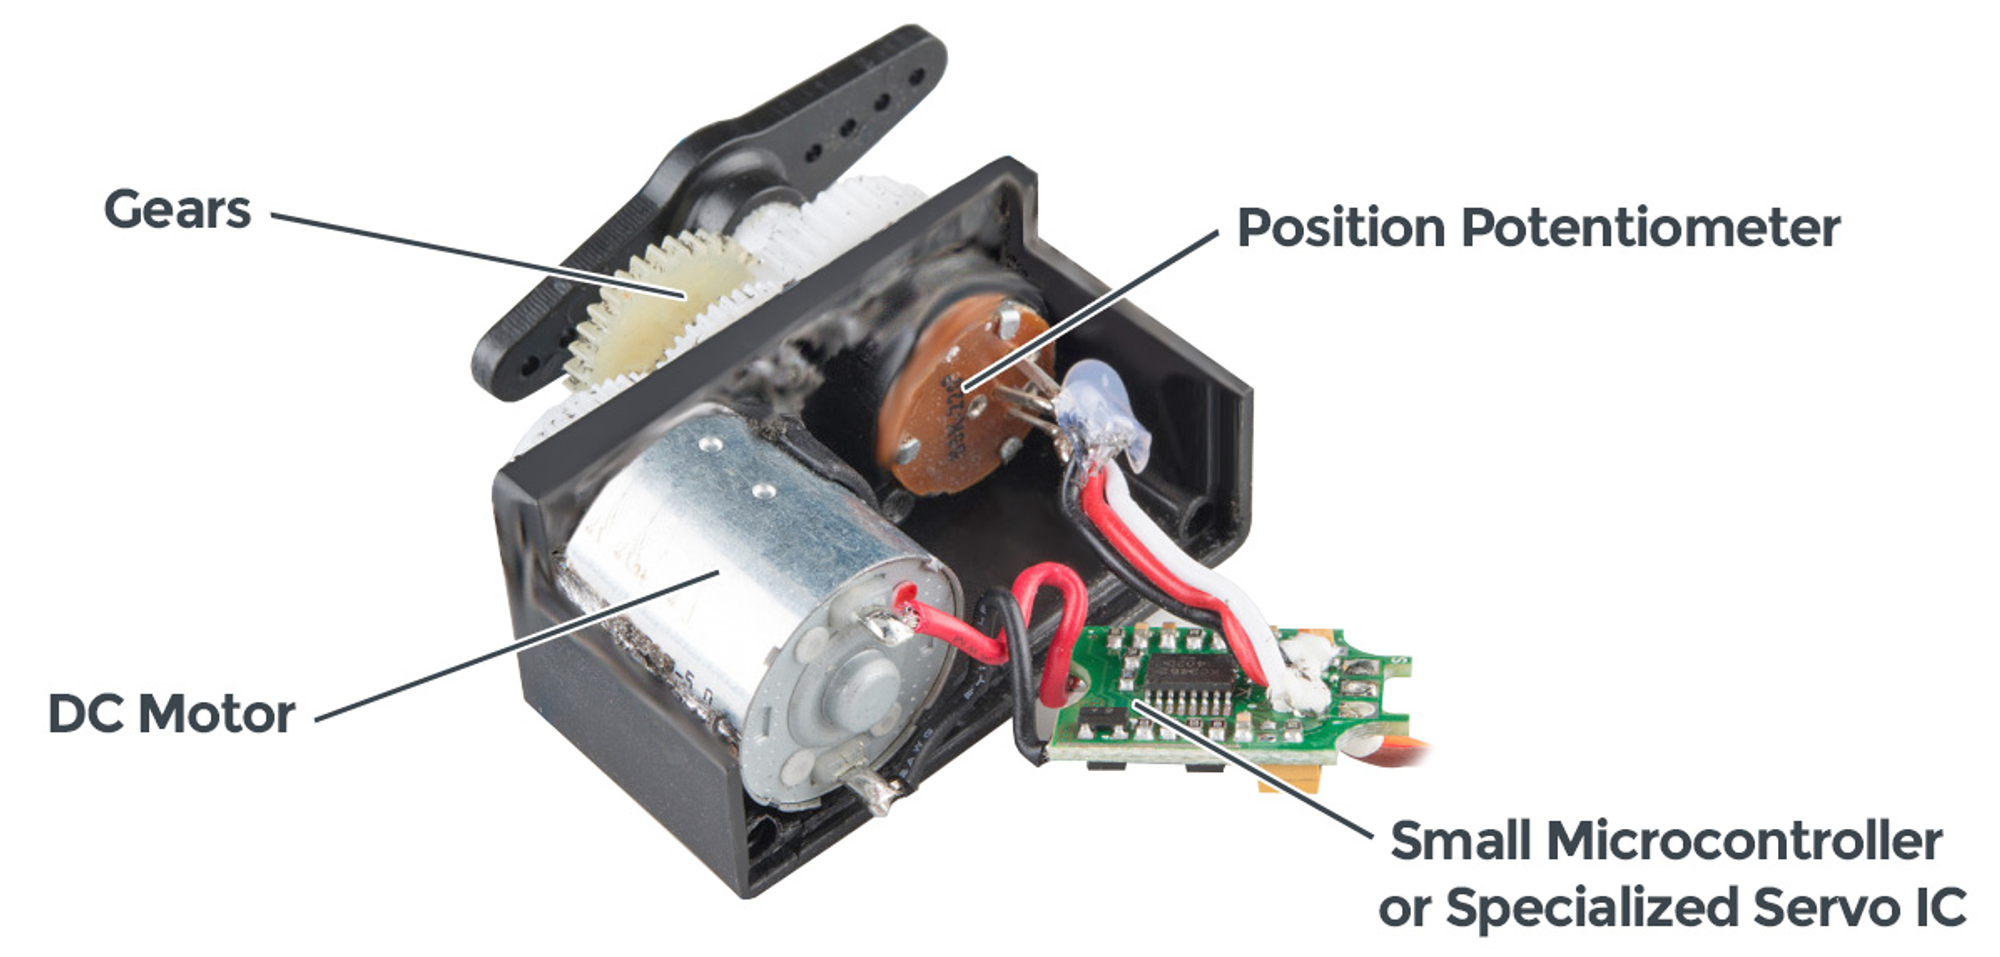
Let’s go for something a bit more complex than the KY-038. Sure the microphone was complex enough to warrant coming accompanied with basic electronic components but very often the modules will come with their own microcontroller (often referred to as “chip” or “IC”, you can call it its “brain”). At that point the arduino and the module have to send each other messages instead of just a digital or analog values.
But fear not!
In arduino-land you always have something called a library, which gives you ready-made functions you can use to interact with the module, and you don’t need to know more than that.
To use a library you need to reference it at the top of your code.
#include <Servo.h>// <-- oh look a wild library appeared

void setup() {

}

void loop() {

}
By doing that I can now use all the functions of the servo library.
The functions which will interest you the most are
attach()write()and that's it.
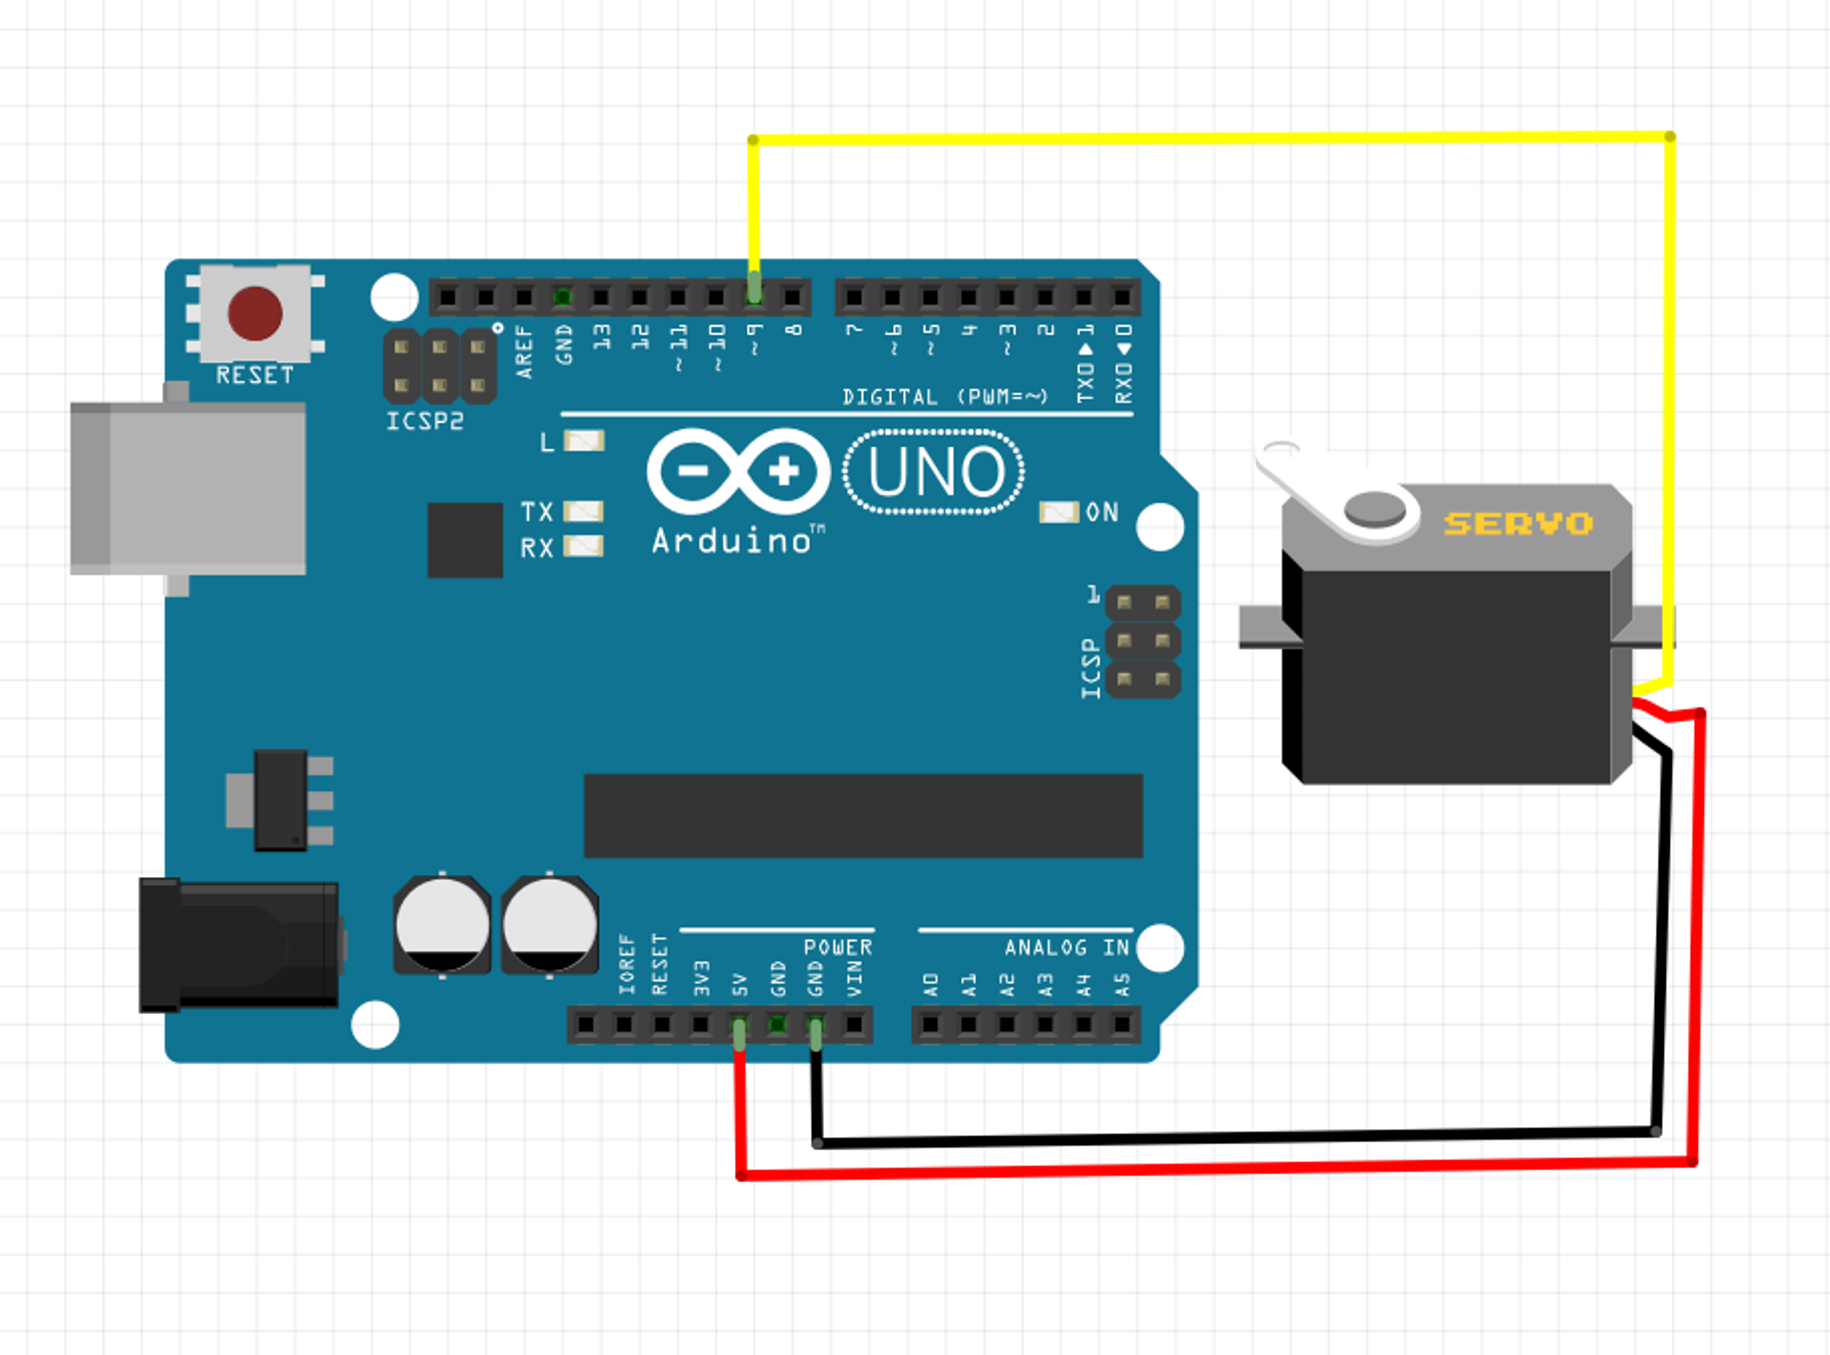
Here is the simplest example of how to use a servo, can you guess which cable is going to be used for the arduino<->servo communication? Yup, the yellow one.

#include <Servo.h>// <-- oh look a wild library appeared

Servo myServo;//this is a variable, which will represent our servo motor

void setup() {
    //declare which pin is used by the servo
    myServo.attach(9);

    //give an "angle" to match to the servo, which is 0 in this case
    myServo.write(0);
}

void loop(){}
We saw earlier that variables can only store one thing. But that thing can be way more complex than just a number. We could store what we call an “object” which is just one thing bundling up different values and functions. Servo myServo; is just that, myServo is a variable of type Servo. So if we want our servo to do something we most likely need to use one of its functions.
Below would be a representation of what we know our myServo variable. Well, at least what we know of it right now.
myServo = {
    attach(),
    write()
}
It’s a bundle of two functions. To use these function we need to reach them so we start with myServo and to access what’s inside we use a dot . so myServo.attach(9) will call the attach() function of myServo.
We could very well have two servo hooked up to our arduino like so
Servo myFirstServo;
Servo mySecondServo;

myFirstServo.attach(9);//here we use the attach function of myFirstServo
mySecondServo.attach(8);//here we use the attach function of mySecondServo
myServo.attach(9) tells the arduino that the servo represented by the variable myServo is connected the pin number 9, because that’s what the attach() function does. Much like the pinMode(myPin, OUTPUT) sets up a pin to emit current or no current, but now we’re setting up the pin to communicate with a servo. Most library comes with a way to start (a.k.a “initialize”) so keep an eye out for this when you try to learn a new module.
myServo.write(0) uses the write() function the servo we previously declared on pin 9 and gives it the order to go to the position 0. write() only takes a number between 0 and 180.
The slightly weird thing is that there are 2 kinds of servos. You use them with the exact same code but it does something different.
- classic : it has a constrained range of motion
- if you give 0 : it will go as far as it can in one direction according to its minimum angle.
- if you give 180 : it will go as far in the opposite direction to reach its maximum angle.
- so for a classic servo with a range of 270 degrees then the value 180 means 270 degrees and the value 90 means 135 degrees.
- if you give 90 : it will go to an angle exactly between the minimum and maximum angle
- continuous : they can rotate continuously
- if you give 0 : it will go as fast as it can in one direction
- if you give 180 : it will go as fast as it can in the other direction
- if you give 90 : it stops / doesn’t move
How can you tell which kind you have? Easy, you can either search for the name on the sticker or just give it write(180) once and see if it stops. If yes, then that’s a classic. If not, that’s a continuous.
Am I pulling all that of my ass? How the fuck could you have found all that on your own?
Let’s say I know I want to work with servos because I wanted a motor in my project and heard they were easier. I search for “arduino servo motor” online which will give me the servo library https://www.arduino.cc/reference/en/libraries/servo/, which only contains 6 functions. After reading the summary of each and lookin at the examples I know that I would realistically only need
attach (https://www.arduino.cc/reference/en/libraries/servo/attach/)
and write (https://www.arduino.cc/reference/en/libraries/servo/write/)
You might have heard it before but “It’s all there in the doc(umentation)”, it sounds annoying but most of the time it’s true. Now, I’m not saying looking into the doc is easy, it’s a skill, you’ll get better with practice. Once it gets easy enough you’ll understand that this sentence is empowering. You can do anything, even what you don’t know yet, it’s all there in the doc! 💪
One last thing to think about, remember that the arduino is communicating with the servo so write() sends the order to the servo of moving. If the arduino sends commands faster than the servo can fulfill them, the servo will have an aneurysm so you need to give time to the servo to do the thing whenever you ask. Luckily just like pinMode(), analogRead(), or digitalWrite() arduinos have a function to wait which written like this
//when this instruction is reached the arduino will just pause for 500 milliseconds
delay(500);
About the dangers of delay()
delay() just flat out stop your arduino which means it will stop reading its sensors. The more delays you will put in your code the slower your arduino will feel.
We’re not going to explore this in this course but there are strategies to something time dependent without blocking your arduino like
- basing yourself on the
millis()function which gives back the number of milliseconds since the arduino has been turned on - not think in seconds as a unit of time but rather in number of times we went through the
loop(){}bloc.
Exercise 11
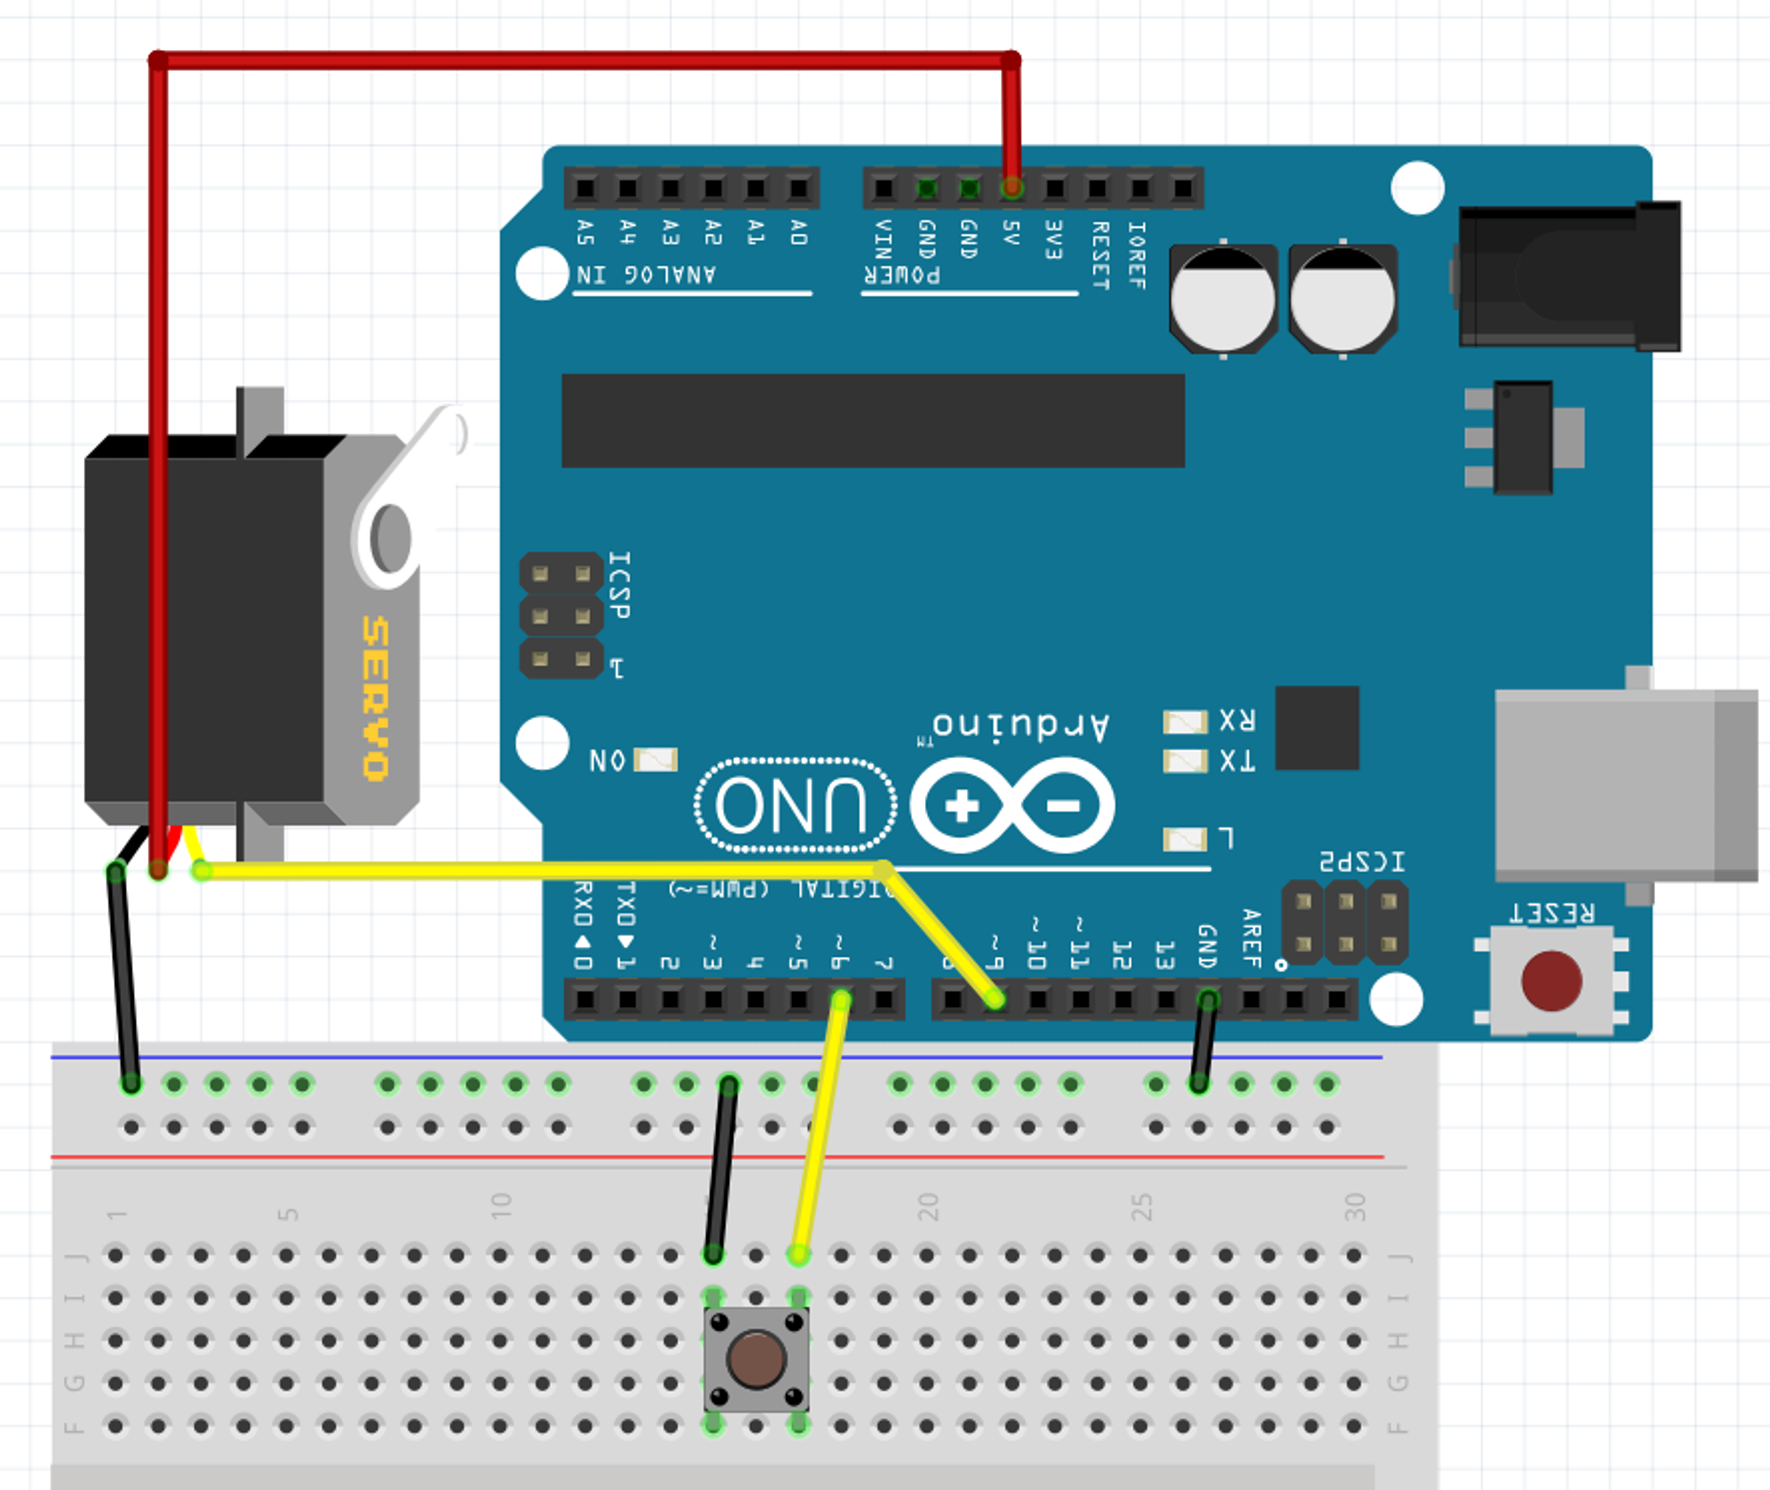
Take a servo and find out if you have continuous or classic servo. Then wire a button and your servo on the arduino.
- if you have a continuous : When the button is pressed the servo should rotate at full speed and when you release the button the servo should stop.
- if you have a classic : When the button is pressed the servo should reach a limit (either its minimum or maximum angle) and when you release the button it should go back in the middle of its range of motion.
For the curious, the answer will be provided with and without the use of
delay(). Feel free to try solving without.
Circuit answer (it covers both scenarios)

Code answer (it covers both scenarios)
#include <Servo.h>

//the variable which lets us interact with our servo (through its functions)
Servo myServo;

void setup() {
    pinMode(6, INPUT_PULLUP);//setting up the button pin
    myServo.attach(9);//setting up the servo pin
}

void loop() {
    int btnState = digitalRead(6);

    if(btnState == 0){//remember, with INPUT_PULLUP 0 means "pressed"
        myServo.write(0);//either 0 or 180 are good answers here
    }else{
        myServo.write(90);//90 means stop to a cuntinuous and "go in the middle" with a classic
    }

  //whatever the state of the button, give time to the servo to do its thing
    delay(500);//500 might be too much, feel free to experiment with other values

    Serial.println(btnState);//now you can see how slowly btState refreshes
}
Code answer without delays
#include <Servo.h>

//the variable which lets us interact with our servo (through its functions)
Servo myServo;

int lastWriteTime = 0;//will store the last time a write command was sent
int writeFrequence = 200;//the number of milliseconds we want in between write commands

void setup() {
    pinMode(6, INPUT_PULLUP);//setting up the button pin
    myServo.attach(9);//setting up the servo pin

  Serial.begin(9600);
}

void loop() {
    int btnState = digitalRead(6);

  //if "right now" is further in time than the last time we sent a command plus the timet we should wait in between writes
  //then it's time to send a write command
  if(millis() > lastWriteTime + writeFrequence){
      if(btnState == 0){//remember, with INPUT_PULLUP 0 means "pressed"
          myServo.write(0);//either 0 or 180 are good answers here
      }else{
          myServo.write(90);//90 means stop to a cuntinuous and "go in the middle" with a classic
      }

      lastWriteTime = millis();//don't forget to refresh the last time we did a write, because we just did one.
  }

  Serial.println(btnState);//now you can see how fast btState refreshes regardless of the servo
}